Showing posts with label construction. Show all posts

Tuesday, January 22, 2013

Finally a Bookshelf!

Do you ever have one of those projects that you put off for months or years, and when it's finally done you think "Why on earth did we not do this sooner?"  This was definitely one of those.  

If we are friends on Facebook, then you already saw some of these pictures, but here is a more detailed play by play.  No, it's not a tutorial on how to build a bookshelf because I don't know how to build a bookshelf!  My job was to document (and not very well I was told), and then putty, paint, and style.

Matt told me I didn't get close ups of how the pieces fit together so perfectly.  He was proud.  As he should be.

I don't have a close up of the craziness going on in the corner before, but here's a shot of that side of the room taken last year.  If you look close, you can see that the corner does not meet at a 90 degree angle.  Because of a support post holding up the roof, the drywall is actually at a 45 degree angle.


To build a bookshelf behind the TV meant we need to create a 90 degree corner so the bookshelf would have a side.  A bookshelf needs to side pieces to attach the shelves to, right?


 Since we were already having to box in the corner, we both had the thought that we could put a door on it and shove the modem and other cords into.  And since the bottom shelf was going to be raised off the floor 4 inches, why not make it removable and run cords under there as well!


These are the kind of pictures Matt wished I took more of.  Perfect joints.  Most people do their best and caulk the rest (is that the saying?).  But Matt's an engineer, so it had to be perfect.  My dad asked how he knows how to build like this. Matt said, it's just geometry.  It's so easy to him (not so much me).  I don't even think he writes any of this down.  It's all in his head.

The shelves are just screwed in from the outside, so no underneath supports needed.


This is Matt's technique for attaching shelves or even mounting cabinets.  Stack things under it until you reach the desired height.  Keeps things still and level.  Great for those of us who don't have 3 or 4 arms.


Matt's job is done.  He(along with co-workers who saw this photo) really wanted to leave it this natural two-tone color.  It's interesting, but SO doesn't go with the rest of our house.  It would have stood out in not a good way since all our trim is white.


 I should also note that the reason the boards are so dark is because they are 20 or 30 yrs old.  Matt's parents were saving them for the perfect project, which never came up, so they gave them to us to use.  Some of them have knotty holes straight through, which really add a lot of character and make it look like a built in piece from an old house.


The plan was to put the stereo and printer on the shelves and run the cords through holes drilled into the side of the bookshelf.  You can see one of the holes in the photo below.  The bottom shelf is removable by drilling a similar hole into the far right side to stick your finger into to lift out.  Under the shelf are all the cords for the TV, printer, stereo, and the cord thingy that connects a laptop to the TV (since we watch nearly all of our tv either on hulu or netflix).


And inside the door is the DSL line and modem.


And here it is finished and styled.  We have plenty of room to grow and change it up as our needs change.  


I'm completely in love with it.  It's amazing how it's really replaced 3 pieces of furniture(bookshelf in other room, tv tray with stereo, small bookshelf with printer and books).  And does it a million times better than those other 3 pieces ever did!


Wednesday, May 30, 2012

Housewarming Party

After 5 months of living here and chugging away at our EXTENSIVE "to do" list, Matt and I finally feel 
settled in our new home.  That meant before summer gets into full swing, it was time to have a party.  
We invited local friends and family and had a pot-luck cookout.  

Setting a deadline (May 5th) of a party, really lit a fire under us.  Matt's "to do" list had over 30 items on it. He really pushed it to the limit to get everything done in time.  We prioritized and had to eliminate a few times that no body but us would notice.

Here is one of our new semi-permanant sitting areas next to the house (between the house and the fire pit).


Matt found the giant rock somewhere in the woods and made a seat out of it.  Right before the guests arrived, I added a bench and some flowers.


My parents drove down early that day to help me set up.  They also brought their new little fur baby for us to meet and to play with our little fur baby.


Our families sitting around waiting for the party to start.


Details shot.


Fifty people came and went (not all at the same time).  Everytime I took a group up to give a tour, someone new would show up and it would start all over.  It was great to have all our friends over (most of whom hadn't seen the house yet), but I was so busy, I didn't get to talk to anyone (other than giving tours).

We were really blessed that the storms that were predicted to hit us all day long, missed us entirely!  That would have been disastrous since the entire party was outside.  We certainly can't hold 50 people in an 800 sq ft house.

Our generous friends also gave us lots of plants for the yard and Lowes gift cards.  I'm still working on getting them in the ground.  I'm about half way done.  Not pictured are a few Weeping Cherry Tree saplings that our neighbor grew and a Norfolk Island Pine (which is an interesting looking house plant) from my grandma.


Hopefully this will be the first of many gatherings and party to take place at our new home!

Friday, March 23, 2012

Kitchen Budget Breakdown

Constructing our kitchen should go down as "cheapest kitchen ever". It's THAT cheap. And I LOVE that it doesn't look like it.


Since building the structure of the house/apartment (whatever you want to call it), was WAY more expensive than we expected, we pinched everywhere to finish the kitchen. We would have pinched anyway (cuz that's just how we roll), but this was just extra motivation.

The cabinets came from a liquidation sale that we heard about through word of mouth almost 4 years ago (yes, we've been storing them that long...our whole marriage!). A local cabinet company was cleaning our their warehouse and had everything priced at around 90% off. The catch was they couldn't order anything. So, if you saw 3 cabinets you liked, those 3 cabinets was all you could get.

Our plan of attack was to find the largest matching set of cabinets. ANY cabinets. Make sure it has some upper cabinets as well. Not having a house or a layout at this point, we knew it would become a puzzle to piece them together. You can read more about how we made them work for our space here. We paid around $400 for the kitchen cabinets ($460 once you add in the bathroom vanity). No, that's not a typo. I did not leave off a zero.

We also hacked this one apart to make an over-the-microwave cabinet.


And of course, the plan was to paint the cabinets white because we didn't have all the matching trim pieces and it would have looked awful having different colors and different types of wood showing. Paint camouflages everything.


Since we were renting our old house, we didn't own the appliances. Now was my big chance to get all stainless steel! They call came from craigslist. We got the fridge for $440, the oven for around $500 (I think), dishwasher for $200, and microwave for $200.

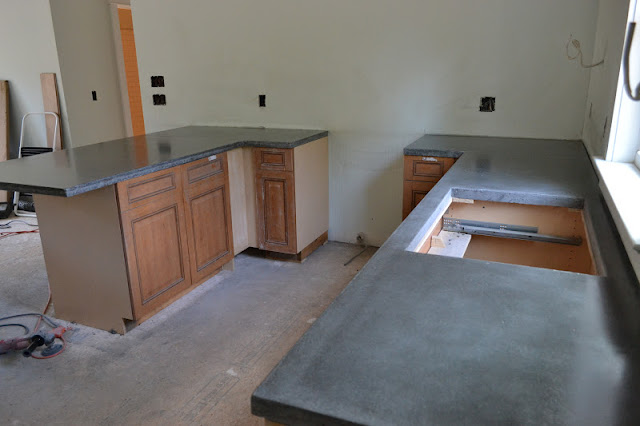
Our original plan was to get laminate counters, but once we looked into it we realized it would be over $1000 for fake plastic countertops and I just really couldn't see paying that. After seeing online tutorials, DIY concrete countertops seemed like something we could do for a fraction of the cost. See the final product here.

Hardware can really add up and contribute to a lot of a kitchen's cost and it's often overlooked when budgeting. Even basic brushed nickel knobs at Lowes cost $4/each. I found basic oil-rubbed bronze knobs and pulls on ebay for $1/each. Since we needed over 22, that works out to a significant savings.


The last major element to our kitchen was the opened shelving. We saved money by using free wood from our land and getting the basic cheap brackets from Lowes and spray painting them oil-rubbed bronze. More on that here.

Then, there's the sink, faucet, and light fixtures. We went basic and cheap for all of them except the faucet. Faucets range from $50-$1000. Sticking with a good name brand was important. We wanted something that wouldn't give us problems. Basically, we got the most attractive thing in the cheap range for $200. And it's a Delta. The light fixtures came from Ikea.

That brings us to the breakdown.

Our Kitchen:

Cabinets: $400
Appliances: $1340
Knobs and Pulls: $25
Counters: $300
Paint: $30
Shelves and Brackets: $47
Sink: $100
Faucet: $200
Hanging Lights: $90

Total: $2,532

...call it $2,500


And by comparison...

A Typical Kitchen:

Ikea Cabinets: $2,000
New Stainless Steel Appliances: $3,700
Knobs and Pulls: $100
Laminate Counters: $1,200
Shelves and Brackets: $150
Sink: $100
Faucet: $200
Hanging Lights: $90

Total: $7,500

Or more like $13,000-15,000 for higher end things like solid surface, granite, or nicer than Ikea cabinets. I didn't include flooring for either total, or any dining furniture (our bar stools were hand-me-downs, btw).

So, like I said. Cheapest-kitchen-ever!!!

Friday, March 16, 2012

I Wish You Well, Wishing Well

I really gotta brag on my husband for a second. The things he has created for this house completely amaze me sometimes. I probably take it for granted that he has the ability and motivation to accomplish so much. After working 45-50 hours in a normal week, he still has the energy to come home everyday and tackle projects around here.

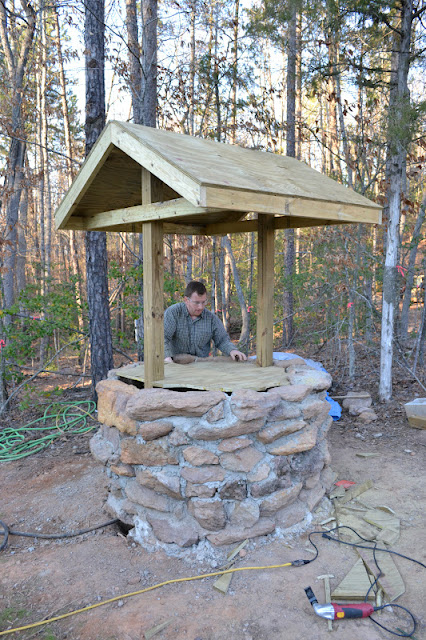
His latest project was our "wishing well". It's not really a functioning wishing well, but we had to do something to insulate the well pump to keep it from freezing up during the winter. It was put on our ASAP list of things to do in December since the pressure switch on the pump already froze twice and Matt lost water mid-shampooing in the shower. He had to dry his soapy self off and go outside in the below freezing temp to thaw out the switch. If it had been me in the shower covered with soap and I lost water, I would have just curled up and cried.

Ever since "the incident", the well has been wrapped up and lit up to keep it nice and warm.


We actually took the temperature one cold night and while the outside air was 17 degrees, it was over 50 in the tarp.

The well drillers wanted to sell us a fake plastic insulating rock for $200. You know the kind you see in everyone else's yards. We were not about to pay $200 for an ugly plastic rock. Especially when we could build a very attractive well house for about the same price (or less).

Matt dug up some rocks (we have no shortage of them and love the FREE part) and cleaned them off. It took three loads like this to complete.


And gathered/bought supplies to build the base. One of those bags has gravel. The other is sand. And he bought mortar mix.


He started by digging a trench to create a foundation of concrete for the rock to sit on. Not really necessary, but couldn't hurt.


Now, just imagine that trench filled with concrete like this (but ring shaped):


He worked on it little by little in the evenings...in the dark. Eventually, it started taking shape.


Lucy's not so sure why she got put up here.


Inside, we still have the lamp to keep it warm, but will end up wiring a permanent light, so we won't have to have a drop cord running across the yard.


Because I am married to an over achieving engineer, I found Matt working on this 3D drawing of the roof:


Awesome and hilarious.

Next, the roof went on.


Then, the cover was cut to shape with a jigsaw.


Lastly, the singles went on.


Other than adding a faux hand crank and bucket, she's done.


Oh, and the cover needs to be permanently attached so it hinges properly for well maintenance purposes.


Wednesday, March 14, 2012

Homegrown Opened Shelving

Way back when we started mentally arranging our kitchen cabinets, I knew I wanted opened shelves. And it was also necessary given the fact that we didn't have enough upper cabinets.


For the past few months, our wedding china (below) has been stored in the corner cabinet. Our glasses were kept behind the second from the left cabinet door. My thrift store set of mismatched white plates and all my serving dishes and random cute lunch plates were still boxed up.


Back in October, Matt pointed out that he had an old tree trunk from a red oak tree that had to be cut down (from our land! hence the blog title). It had been drying out for the past 2 years, so it was prime time to do something with it (no longer green, but not rotten yet).

Unsure of how they would come out, Matt said he could cut planks with his chainsaw. For those of you with chainsaw experience (not this girl!), this is apparently quite challenging. You really should use a saw mill to cut planks (but who has one of those? and no, that is one of a few things we don't own....yet).


Once the trunk was cut to an approximate length, we used a chalk line to mark the thickness of the shelves.


A LOT of saw dust was created.


Here's the first shelf:


And the rest being cut:


Lucy looking on, as we make lots of loud noises.


See her little head in the rail?

We let them continue to dry out (now that the wood was cut opened) for the next few months. After we moved in, I started working on sanding them down and sealing them.

First, I removed the bark which was dry rotting and flaking off already. We kept the "live edge" (as it is called in the business), which means we removed the bark but kept the natural curve of the tree's outer edge. Then, I sanded the top and bottom down with 60 grit and 150 grit sandpaper with my electric sander.


The wood was not going to be completely smooth (I knew that), but that's kinda the look, right? It would take hours and hours of sanding to get the chainsaw marks off.

After brushing the dust off, I brushed on a coat of semi-gloss polyurethane.


Sanded (this time by hand very quickly) again to get the pricklies off, then a second coat of poly. We let them cure outside for a week or so. Most of the fumes were gone then. We moved them inside to let them acclimate to the indoor humidity before screwing them to the wall. They unintentionally acclimated for several weeks because we didn't get around to installing them until last week.


The brackets came from Lowes. They were the super cheap ones because we had to buy so many. They came in white and grey. I spray painted them oil-rubbed bronze. We did our best to screw them into studs, but there is no stud in the brackets right next to the window.

So, we used the largest drywall anchors we could find. At least two of the three brackets are in studs, so it should be more than fine.


Then, came the fun part: adding all my dishes.


The wedding dishes AND the white 50 cent thrift store dishes both fit on the opened shelves. That means the corner cabinet was freed up to store vases, candlesticks, serving pieces, and random other dishes.

There were a few dishes still in the dish washer when these pictures were taken, but this is most of them.


I'd like to add that ALL our glasses (except for the tall water goblets) came from thrift/antique stores. Three pink glass tea glasses are still boxed up somewhere (also vintage). I love them.


We still haven't gotten around to rewiring and lowering the over-the-sink light (which the electricians goofed up). It should be hanging in front of the window, not in front of the upper window trim.

Matt and I are both totally in love with the shelves. He also loves that it's easier to put dishes up and he doesn't have to think about where things are located because they aren't hidden.

As for how much we spent:

-wood for shelves: free
-brackets: $28 for 18 (3 weren't used)
-oil rubbed bronze spray paint: $5
-drywall anchors: $14 for two packs
-polyurethane: already had

Total: $47

LinkWithin

Related Posts Plugin for WordPress, Blogger...