
It was finally time to conquer the project that I had been dreading. A project I had no experience doing. A project that involved....MATH (gag!). Yes, this project was tiling the shower in our new house. I think what scared me the most was just getting started.
While I love the look of mosaic glass or marble tile, it was way out of our budget.

We had to stick with the most basic tile choices. But I still wanted it to look good, which pretty much narrowed it down to white subway tile (as apposed to standard square tile, which looks cheap and dated, in my opinion).
A look I've seen all over the internet is white subway tile (3x6 tile), with light gray grout instead of standard white grout. I love this look so that's what I went with. Here are some examples:


Gaaah! A girl can dream can't see she?
Everyone told me that tiling was easy, but we had to go and complicate it by adding recessed shelves into the wall for shampoo bottles. Such as these:

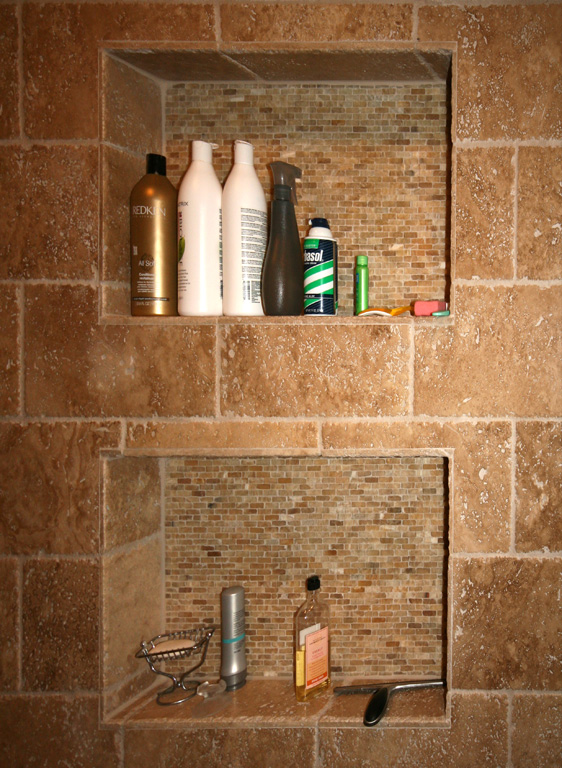

The last picture is closest to what ours will look like. We were going to add a second short shelf below the large one, for a bar of soap and razors, but I was already freaking out about doing any shelf, so a small one that you can barely fit your hands in seemed way too much for a novice to take on.
Notice how on the white shelf above, that the top and bottom of it fall exactly on a grout line so that they didn't have to make weird L cuts on the tile like the natural stone shelf above that. Also, the inside of the shelf has to be trim with tile that doesn't have a raw edge showing.
Before we can even think about tile, we had to prep the shower stall. Interior walls don't have insulation, but it's a nice touch to insulate your bathroom walls for privacy. Most of the walls were already drywalled so it was too late, but we still had the chance to insulate the shower wall that is shared with the bedroom. That will be nice when one of us is sleeping.
Next, Matt built the shelf out of 2x4s. The width was pre-determined by the wall studs.

This shot shows the insulation in place, both shelves built (before we decided to nix the lower one), and our water barrier (aka plastic) stapled up. After this, I cut an "x" into the plastic covering the shelf so that I could line it with plastic also. It's kinda like wrapping a present (but doesn't have to be as neat).
Silly me forgot to take a photo of the HardieBacker as we were installing it or ever after it was installed. It was pretty much a huge headache and delayed the start of tiling a few weeks. HardieBacker is just one name brand of concrete backer board which is used in place of drywall in areas of high moisture. Concrete is water stable, which means water can pass through it (so it's not waterproof), but it's totally unaffected by the water (meaning it will maintain it's strength even when wet, and will dry out and be totally the same as it was before).
The drywall was 1/2 in. so we bought 1/2 in. hardiebacker. Then we learned that 1/2 in. hardiebacker is actually 3/8 in. Kinda like a 2x4 that is actually 1 1/2 x 3 1/2 in. So when went went to hang the hardiebacker, it wasn't flush with the drywall. We needed to add shims to the wall studs to bring it out 1/8 in. Lowes, apparently, doesn't sell shims. They only sell wedges. Matt asked about 4 different employees for shims and told them he didn't need a wedge, and they all pointed him towards wedges. This really frustrated him because they are NOT the same thing! At all!
What do you do when you can't find 1/8 in. shims? You make your own. The hardiebacker is actually comprised of several layers of composite concrete pressed together. Somehow he was able to pry it apart and break them into nice long pieces 1 1/2 in. wide and 4-12 inches long. These were nailed to the studs in the wall.
The hardieboard cutting instuctions were to score the board with a carbide tip scoring knife, and then "snap". This must be some kind of joke, because it did not "snap". Even after scoring it 8 times, it did not "snap". But after 8 times, you've pretty much cut through it, and then you just break it like you are breaking the bottom crust off of really crusty bread. I'd really like to hear from someone about this whole "snap" thing.
So, it got cut to size and screwed into the wall (this was when we covered up the small shelf we didn't want anymore). Again, sorry for no pictures. Matt was mostly working on this by himself. I'm borrowing this photo from John and Sherry at younghouselove.com

Just before tiling began, I added fiberglass mesh tape to the seams of the hardiboard, and covered it with thinset (as per instructions online). I found lots of conflicting advise about tiling a shower, so we picked the advise that sounded good to us (usually the easiest way). We read lots of things that said, "you must do ____, or else ____". Then others said "I didn't do ____ 3 years ago and it was fine."
Now comes what you've all been waiting for: the tile!
You can see the hardiebacker and thinset still exposed on the wall. This is your best look at it. After day one, I was up to here.

On day two, I had to start cutting tile. After reading/talking to other people who have tiled, they all strongly recommended using a wet saw. Since we didn't know anyone who owned one, we either had to rent one or buy one.
Lowes sells a relatively cheap one, which got REALLY good reviews online. And at $89 it's cheaper than we could rent one for.

This saw was so easy to use. I had no problems using it by myself. Tiles are cut with diamond bits instead of sharp jagged teeth, so that made it less scary to me. The tile glides through like warm butter. A little bit of mist and tile dust shoots out at your belly, but overall, it wasn't that messy. The added water eventually turns into mud (from tile dust), which has to be wiped off each tile after cutting.
At the end of day two, the shower looked like this:

At the end of day two, the shower looked like this:


After day one, I realized that our placement of the shelf didn't exactly go as planned. I don't know how it happened (since I'm not the math person), but after 12 rows of 3 inch tile with built in 1/16 in. spacers, somehow the grout line didn't land a the bottom of the shelf.

It was about 1/2 in too short. Which means if I use the border piece around the inside of the shelf, like I planned, there would be a huge gap under it that would have to be filled with a sliver a tile that continues along that same row. That was not an option. There would be no slivers of tile in my shower if I had anything to say about it.
Had that row ended even lower, we wouldn't been dealing with a skinny sliver and I could have made it work. A tile cut to 1.5 in. high would have been fine, but .5 in. is not ok. So, on one of my daily trips to Home Depot, I looked for a solution to this problem. I found another kind of border piece: the bull-nose border tile. It has a curve on the end that happens to be about 1/2. Perfect to full up our gap.
This was either day three or four:

I used $10 tile nippers (which I already owned from years ago) to nip out notches for the pipes. This will all get covered up with the decorative plate on the plumbing fixture, but I still think I did an awesome job.


Day 4 or 5 (I've lost track):

I decide to not continue the border piece along the top edge and diagonal edge. Since there were 3 inches to spare on the top row above, it would either fit one more 3 inch wall tile, or one 2 inch border tile, plus less than one inch of wall tile (basically cut into a sliver). I think a sliver of tile under the border tile would look way worse than not having a border at all.
All the tile is done now:
All the tile is done now:

Close-up on the shelf:

See how the bull-nose piece curves down, meeting up with the next row of tile? Not perfect, but not bad either. It was hard cutting the little pieces inside to fit. Some of them took 4 or 5 tries. The "L" cuts were not as bad as I thought they would be.
Like I said in the beginning, I used gray grout, which was pretty simple to apply (and messy). A tile float was recommended, but since there were so many small areas and corners I had to get into, I found just using my hand was easier. Scoop up a small handful of grout and spread it on, pushing it into the cracks. The sponginess of the tile float is not that unsimilar to the sponginess of a human hand.
Like I said in the beginning, I used gray grout, which was pretty simple to apply (and messy). A tile float was recommended, but since there were so many small areas and corners I had to get into, I found just using my hand was easier. Scoop up a small handful of grout and spread it on, pushing it into the cracks. The sponginess of the tile float is not that unsimilar to the sponginess of a human hand.


The caulk in the corners and along top of tub will be gray to match the grout. The caulk on the outside of the border (that meets with the wall paint) will be white I think. Do you think that would look natural? Or should it all be gray?
I haven't added it all up, but the total cost of this project is around $250 (maybe as much as $300. I'm not sure). $250 happens to be the cost of the fiberglass shower wall inserts that are fake and hollow and uncustomized. I think we came out pretty good.
**Update**
The TRUE after picture:

Very impressed Allison & Matt!! Subway tile is my favorite, I think the caulk around the outside should be white, like you said- hope I'm not too late to reply, lol.
ReplyDeletehaha, yeah that was a while ago. so much has happened since then. I can't even remember what color it is!
ReplyDeleteVery nice! Love the colors!
ReplyDeletewhite marble tile
I love your style, girl! You know exactly where to get your inspirations. A renovation under a tight budget could still look amazing. It just needs a little brainstorming, research, resourcefulness, and of course, creativity. Your bathroom was a success! Congratulations!
ReplyDeleteChet Johnston