Monday, October 31, 2011

Fire Ring

In preparation of tilling and seeding the yard, we had to move our fire ring to it's new location. The old fire ring was located just feet from the driveway (because the driveway wasn't always there). Matt already had a spot that he flattened out. We just threw all the rocks and wood into the skid steer for easy transport.


Isn't this bench awesome?


This is such an upgrade from our former fire ring:


It's looking even sadder because it's raining in this photo. We actually usually have white plastic chairs around, but they were already moved.


The old location is the red ring. The new location is set further back.


We've already taken it for a test run when my mom was in town. We'll be using this a lot this winter since we won't have an indoor fireplace anymore (sad face).

Sunday, October 30, 2011

High Time for a Paint Job

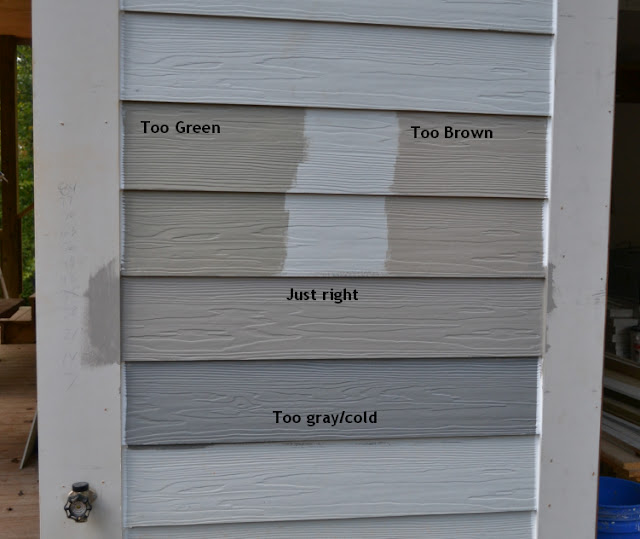
I've been staring at these samples for months.


Well actually, just the two on the top have been there for months. Both are in the gray family, but not just plain gray. The one on the top left is call "artichoke". Yeah, really! I don't see it at all. Artichokes are green. This is gray with a little brown and green in it. The colors on the computer really don't show it well.

The one on the top right is "coastal villa". It was really too tan for me. Remember gray is the new tan!

So I added the sample on the bottom. It's more of a true gray. But it's too cold feeling.

I should note that I got all these samples from Lowes for $3 or $4 each. They will mix up any Valspar color in a sample half-pint size.

It still didn't feel right to me, so I went to my favorite paint store (Sherwin Williams), which is actually the place where the paint will be coming from. They had a pamphlet full of grays and neutrals!

I matched the bottom shade from above with a shade that was closest, but warmer at Sherwin Williams. It's called "dovetail".


I didn't know this, but Sherwin Williams also will mix up a sample for you in any shade. The catch is, it's a full pint (i think) instead of a half pint so it cost $6 instead of the $3 at Lowes. Sherwin Williams says mixing colors in a larger size give you a truer sample of the shade.

Here are the same 4 samples that were painted on the house again in a different format. I think you can see the differences better here (although the dovetail is looking a little purple).


For the siding inside the staircase, I went with a gray that is two shades lighter because there is hardly any daylight. And in person, now that it's painted, it feels like the same shade as outside. You'd never know it was two shades lighter. But I'm sure it would feel cave-like had it been the same exact shade.

On the porch/deck ceiling, I chose "enamelware" by Martha Stewart. It's the same color that I painted our current kitchen/laundry room. Apparently it's tradition in the south to paint porch ceiling a light blue color. I just think it's pretty. People thought that the blue kept mosquitoes away. And actually, it did, back when paints were made differently and blue paint was made with milk and had lye in it. Lye repels insects, not the color blue. But the belief still exists today.

So the painters got started on a Saturday. They had to caulk EVERYTHING so water wouldn't seep into the spaces between the boards. They also had to prime and paint all the raw wood and trim. Then they sprayed the siding color on. The three of them were done in 5 days.

You can't be a painter and have a fear of heights. We hired these guys because they have no fear and everyone else wanted to charge us an extra $1000 to rent a lift so they wouldn't have to be on 40 ft ladder. I understand. I can't even go 10 ft up a ladder without feeling dizzy.


I swear the ceiling is actually blue. I know it looks white. But just wait until I show it to you in the staircase. The overcast light washes the color out (and I'm not just talking about the ceiling). It's much bluer on sunny days.


Monday, October 24, 2011

Concrete Counters Part 5: the reveal!

After the countertops were set into place, next was to sand and polish them. Ideally, you would do this in another room (like a garage or outside) and not with them in place. But since we poured them in our second story kitchen, we were not going to carry them downstairs and back up. It also would have been good to have them on a stand away from the brand new drywall, but they would have been in our way of doing other work.

When we flipped the countertops over, they looked generally hole-less except for a few areas like this:


Notice how some of the holes are partially covered by a hardened film. To expose the holes fully (so I could patch them), I used a wire brush on the whole counter. That's when my heart sank.

The entire countertop was full of holes. Even the areas that looked perfect like this:


The wire brush revealed thousands of holes ranging from pin size to pea size. Not only is this a cosmetic issue, but also a sanitary issue. The holes would get full of food and germs. We were expecting some holes and were prepared to patch them one by one. All the other bloggers had experienced the same problem, but we had too many to count.

You might be thinking, why didn't I just leave them covered up instead of revealing them with the wire brush? Well, during the sanding/polishing process they would be exposed anyway, so we wanted to get that part over with and get them filled.

You can see an area below that had a lot of holes. Sorry I don't have a close-up picture.


We don't really know what happened to make this many air holes. We vibrated the forms a lot (or at least I though it was a lot). Maybe our mixture was too dry. But we intentionally made the bar piece wetter to cut down on the holes. If we had it to do over, I think I would rent a professional concrete vibrator. Also, instead of pouring them in forms that were on the floor, we probably should raise them up on saw horses or something so that we can vibrate them from underneath.

I did my research on how to fill the pin holes when they are too small to fill by hand (and too many). The tips I found suggested mixing a cement slurry. Instead of using concrete mix (which consists of cement, sand, and gravel) to patch it, use a watered down solution of just cement. The sand in the concrete mix was too large to fall into the holes. Cement is a fine powder.

The idea was to water it down enough so you can brush or spread it onto the surface and it will fall into the holes. I tried this (and added my pigment to the mix to color match it to the countertops). It didn't work. There was too much water tension on the small holes and it wouldn't fall into them. Also, cement wouldn't take the pigment like the concrete mix did, so it was a different color.

As my slurry was drying/evaporating into a mud and I was at a breaking point of frustration, Matt started pushing the thickened slurry into a hole with his finger. It worked!


So that's what I did. Mushed it around with my fingers.


Looking back, I really wish I had put on a latex glove because while cement is usually just very drying to the skin, when it sits on there for an hour, rubbing and scrapping along a surface, it really starts to burn. By the end, I had 4 or 5 little chemical burns on my hand and for the next week my skin was peeling like I had Elmer's glue all over it.

I didn't fill the holes in the sides of the counters because I really love the way they look. It's rustic industrial and doesn't pose a sanitation issue. Once the slurry was cured for 24 hrs, it was time to start sanding.


I have a mouse palm sander of my own. Matt as another palm sander. His dad has a random orbit sander. And we found a orbital sander/grinder with 7 in. attachment on craigslist which we thought would be perfect. We also decided to just use regular sandpaper from the home improvement store. Ideally, you should use diamond grit sandpaper/polishing pads, but they can be very expensive.

I tried all 4 sanders. I spent days and days sanding away. The counters did get smooth. That wasn't really the issue. The issue was the discoloration. The deeper you sand, the lighter the color got and the more aggregate showed (aka the little rocks). That stuff is supposed to show. Like when you add glass chips to the concrete and want it to look like sparkly granite. You have to sand past the top layer to reveal them.

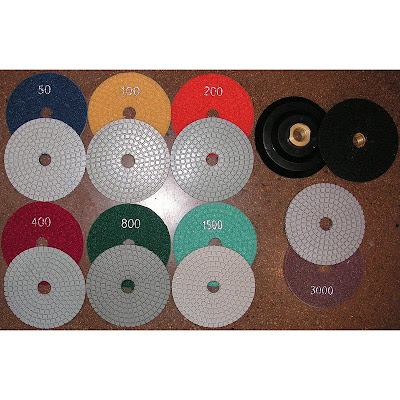
The sanding was so inconsistent and splotchy looking. I was so upset about it and beginning to regret not investing in those diamond grit pads from the start. So we finally bought them. I found some on amazon.com that were 4 in. pads (much cheaper than 7 inch). I got this whole set for around $25. 7 inch pads are around $25 EACH!


They start at 50 grit and move up to 3000. 50 and 100 grit remove the most material and 800-3000 really bring out the aggregate and give it the feel of granite.

These pads changed my life! That may be a bit dramatic, but they did. Messing around with the sandpaper and different sanders was such a pain! I wish I wouldn't have wasted that much time when the concrete was still "soft" those first few weeks.


In one afternoon I used all 7 pads (actually I skipped a few). But they it still didn't look right to me. Still looked splotchy too me. I remembered that a video I watched said these pads work better then they are used wet. We don't have one of those fancy grinders that has a water feed to it, so the next day I just used a jug of water and kept wetting down the surface. The grinder sprays the dirty water EVERYWHERE on that plane. Which meant my stomach and the kitchen walls were covered with dark grey mud (sorry, no picture). But it worked. And that's what counts. Repainting is not a big deal.

The next step was to clean off any residual powder and particles from the countertops and let dry thoroughly. The next day I rolled on high gloss concrete sealer with a 4 inch foam roller. This prevents water and stains from soaking in once you are using your countertops. I only did one coat, but the other day I put my cold drink down on it and it left a water ring which soaked in. So, I'll probably put another coat on before we move it. And I also need to wax it. But it's basically a usable countertop now, and I have to say I am loving it! I don't think I've ever worked something so hard in my life!

I haven't added up the receipts yet, but I think this project fell somewhere in the neighborhood of $300. Professionals charge around $5,000 (granted, theirs look much more high end). And to get laminate countertops would have been around $1,200. I still think it was worth it. I would even do it again, especially after learning what not to do.

And now for the reveal. I will be painting the cabinets white, so don't let the two-toned wood distract you.


To go back and read the whole process click here:
Research and brainstorming: Concrete Counters Part 1
Building the Forms: Concrete Counters Part 2
Pouring the Concrete: Concrete Counters Part 3
Flipping and Installing the Counters: Concrete Counters Part 4

Thursday, October 20, 2011

Tile Floor

After gaining lots of experience with tiling the shower, I knew it would be a piece of cake to tile the floor. It really didn't intimidate me at all. The only hard part was deciding on WHAT tile to use.

I quickly narrowed down the options at Home Depot (the selection is the same as Lowes, but prices are a tiny bit cheaper at Home Depot). First, I picked out a 12x12in tile that was in the $1 range (aka the cheapest). I don't like tan or beige. Gray is the new beige, didn't you know? I found a dark gray tile with bits of brown in it to warm it up.


Since our bathroom is only 30 sq ft (even smaller once the vanity is added), to buy a slightly more expensive tile only increased the total tile cost by $30. So I picked out a second option. Vintage black and white tile. I LOVE the look of this tile and have so many inspiration photos with tile like this.


Problem was, I didn't love it in our bathroom. It looks too busy to me with the gray lines of grout in the shower. Also, the grout with this tile would have to be white and I really liked the idea of having dark grout to hide dirt with the other tile. Too much going on for a small bathroom.

So the dark 12x12 in tile wins. It has so many things going for it: cheaper, hides dirt, easier to install, less grouting to do, looks more clean and simple.

The first step to tiling was to clear the room of all my supplies. Then, shop vac the floor to remove dirt and dust. Then cut the underlayment (concrete hardiboard) to fit and use thinset to set it in place.


One last chance to change my mind. Nope, still going with the dark one.


Next step was to dry fit the tile. I didn't have this luxury when I tiled the shower walls, due to gravity. First, I laid them out in straight lines, parallel to the wall.


Then I tried it diagonally (which is what I originally wanted, but I just wanted to review all my options).


So, so much better. Diagonal lines trick the eye and make the room seem larger (true story). I think it also looks more professional.

Only question was, can our wet saw cut tile that is 17 long (length of the diagonal cut threw the middle of the 12 in. tile)?


At first it didn't seem so. The silver bar on the left is the guide bar that can be set to a specific measurement. I used this a lot when doing the shower tile. The black attachment is used to cut a 45 degree angle, which is what we need on the 12in. floor tiles.

Hopefully, you can see how the corner of the tile can't fit into the black attachment and also have the saw blade meet up with the middle line. I feared this meant I couldn't lay them in a diagonal pattern if I had no way to cut them.

Turns out you can just remove the guide edge and attachment and just feed the tile into the blade free handed. The saw is not actually on here. When it's on, it sprays a mist of water all over you (dirty water).


It might not have been a perfect cut, but all the cut edges will be hidden by caulk or wood baseboards.

Irregular and curve cuts are much less simple. That's where tile nippers come into hand.


How in the world do you cut around a door frame? Well, you make a template. Once your template matches up, trace it onto your tile.


Then you're going to make a series of parallel cuts in the area that you're trying to remove (stopping at the lines you drew). I borrowed this picture since I couldn't really take a picture of myself doing it.


Then use the tile nippers and nip away the "sticks" of tile. (Another borrowed picture.)


Tile nippers can be use "free handed" without a wet saw. I did this a lot around plumbing fixtures, only because it will be fully hidden after the fixtures are installed. Tile nippers by themselves don't leave a clean line.

The first day I dry fitted half of the floor. There should be tile spacers in between each one to insure a perfect fit, but the ones I bought I decided were too big. So I took them back and bought 3/16 in. spacers instead of 1/4 in. spacers.


Here is where it is important to step back and take a look at your work so far. I almost forgot to mix up the tile from box to box. Each box might come from different batches and the patterns will look different (and mine really did!). As long as you mix them up randomly on the floor, it will look natural. You don't want to use an entire box for the first few rows, then switch to a different box and have it look totally different.

Let's take another look at the first section that was already dry fit.


Those tiles outlined are from a different box. They are more splotchy and brown. I didn't notice until I stood up and then it was glaringly obvious. I'm so glad they weren't adhered down yet!

Now you can add your tile spacers.


After everything was dry fit, I started applying tile adhesive to the back of each tile, one at a time. I prefer this method to applying adhesive to a large area and then placing the tiles back on. This method is neater and more precise.


After waiting at least 24 hrs for the adhesive to cure, it's time to grout. I picked out "Sahara Beige". It's as dark as the tile and is also a warm gray. This is really a personal preference, but most people don't want the grout to stand out. The tile is the expensive part and the pretty part, so you want that to take center stage. You do that by picking a grout that "disappears" the best when held against the tile.


When I went to Lowes to buy the grout, they didn't have the small bag of it in stock. They only had large bags. I didn't even need the whole small bag because our room is so small. The Lowes guy was helping me look for the color and he went to check their stack of bags with holes (typically unsellable). He found a large bag of sahara beige with a hole in it. They regularly sell for around $13, but he said he could give me the holey back for $1. Um, yes please! I'll be putting a hole in it in about an hour. And he bagged it in plastic to keep our car clean.

Mixing the grout is really easy. You just add water until it's the consistency of a Wendy's frosty (I've heard this comparison from lots of people). Use a grout float to help squish it into the grooves.

Then, get a large bucket of water and large cleaning sponge. Use a clean sponge to wipe up the excess grout from the tile. Wipe, rinse sponge out, and wipe again.

Work your way out the door so you don't get trapped.
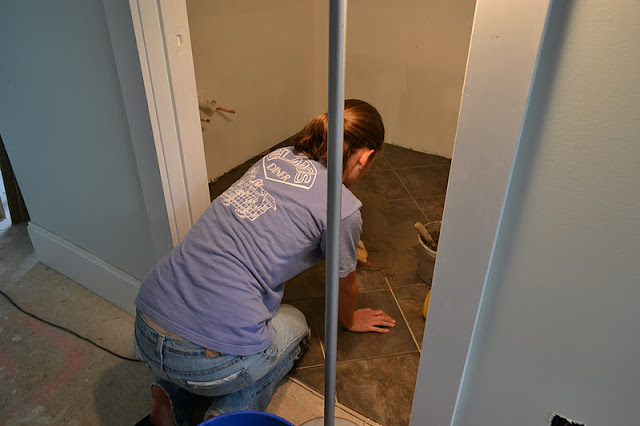


If you have them, knee pads are a life saver!!


Here it is done, and still wet. After it's dry, come back and sponge off the grout residue (call "grout haze") from the tiles one last time.


And here it is dry:


If you are thinking what I am thinking, then you think the grout dry much lighter than you expected. Once again, here is the color of the sample.


That does NOT match.

If you ask me, the grout looks more like this one and the one above it.


Not much I can do about it now. I've heard you can get grout stain, but I'm not going to worry with it yet. Maybe it will darken with use (aka dirt). Although I did apply grout sealer to help prevent too much staining.

And there you have it. The floor is done. A few remaining details like caulking along the wall and tub are not shown yet, but you get the idea.

LinkWithin

Related Posts Plugin for WordPress, Blogger...