Friday, August 12, 2011

The O-M-G Salad

Has anyone else tried this salad?


It's the Southwest Salad from McDonald's. I think fate brought me to this salad. It was the 4th of July(a Monday), and we had just gotten back into town from vacation. So, of course, we were looking for some quick dinner. We headed to Chick-Fil-A for a nugget meal and a chicken strip salad with berry balsamic dressing(yum).

Hmm...no cars in the parking lot. That's what they call a clue.

Sure enough, they were closed.

McDonald's was right next door. I NEVER go to McDonald's(no offense to those who do). I decided to give it a shot and see what salads they had. The place was empty since it was a holiday. I asked the cashier girl if the southwest salad on the menu was any good, since there was no picture to go by. I'll never forget her response: "Gasp! O-M-G!! That salad is sooo good!" Yes, she spelled it out slow like that.

Sold.

My life has forever changed.

I can't get enough McDonald's these days. I think I've at least 5 since then, and that's a whole lot of eating out for me. This salad is probably kinda on the DL since most of us don't associate golden arches with tasty healthy salads. They pretty much get the bad rap and are made out to be the "worst" fast food chain out there.

I challenge you to go try this salad. It has your choice of grilled or crispy chicken(please don't get crispy. that's bad for you), roasted corn and black beans, chili-lime tortilla strips, cheese, and maybe some other stuff, and a wedge of lime. It comes with Newman's Own Southwest dressing. This salad has just the right amount of spice to it that isn't overwhelming at all! (not like those spicy fried chicken sandwich/salads that I can't eat)

It's even featured in a Cooking Light article about fast food survival guide.

Wednesday, August 10, 2011

Lucy In the Creek! (and the flooded creek)

Last Sunday we had nothing to do(very rare), or rather, we didn't have enough time to ACTUALLY do any serious work. So, Matt and I took Lucy to the creek for the first time. Well, to tell the truth, she actually went once before for about 5 min, but we didn't have the camera, so it doesn't count, right?

We made her go swimming once before in an actual lake. She was not a fan. She's a shepherd/terrier(?) mix so we didn't expect much.

But what dog doesn't like a good creek???

In short, she had a ball. Lucy is going to LOVE living here.


6 days later, that tree looked like this:


The following Friday, our area got hit with a huge thunderstorm. We got several inches of rain in a matter of hours. Parts of the city flooded and it goes without saying that they are not supposed to flood.

CREEKS, however, are supposed to flood. The run off from the town dumps into a creek, which runs into our creek, which runs into something else. Every time we have a big rain, the terrain of the creek bed changes drastically. The sand bars move, or entirely disappear. Trees that are laying across the creek get swept away. Living trees on the bank fall into the creek creating new blockages. And trash floats down stream, landing on our banks. A little bit erodes each time.

So, right after the storm passed, and Matt got off work, we went to check it out.


The water had already dropped some. As you can see, the water had been out of the banks of the creek.


When we arrived, it was still quite high. We walked around an down past our property line, onto the neighbors side to see where two creeks run into each other. The water was actually moving pretty fast. If Lucy had fallen/jumped in, she would have been gone in a second, down the river(Matt would have jumped in after her). Luckily, she wasn't that interested. Just sniffed it a little before we called her off.


I think she had fun anyway.


We think she might have a low energy problem.

Thursday, August 4, 2011

Chipotle Lime Pork Tenderloin

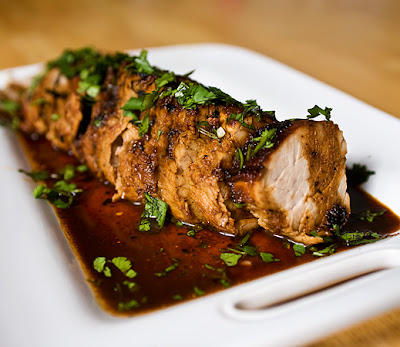
I can't believe it's taken me 2 years to blog about this recipe. It's one of our favorites and is GREAT for summertime entertaining! I originally saw this recipe on an episode of "Good Eats with Alton Brown". The episode was all about pork tenderloin being the new week-night lean meat. Trust me, you've never had pork tenderloin until you've had this pork tenderloin.


(ok so that's not my photo, but dang it looks good!)

Every time we make this for company, someone asks for the recipe. For once, I took photos WHILE I cooked!!

Here are the players for the marinade(minus the lemons, plus garlic powder):


For one tenderloin, you need 1/2 cup fresh lime juice(about 4 limes). This takes a surprising amount of muscle. Maybe one of those squeezy handle things would be easier, but I have the old school kind. I usually make a man do this, if there is one around, so I can move on to other things.


Oh, you should probably do this step before juicing. You need zest from one lime. You don't have to have to zest it after it's been juiced. That's seems frustrating. I guess you could also buy an extra lime to be on the safe side.


Once all the juicing and zesting is done, add 1/4 cup of honey, 1/2 tsp of salt, and 1/2 tsp of garlic powder.


Mix it well.

The last ingredient is chipotle peppers in adobo sauce. The original recipe calls for 1 pepper chopped, but once that can is opened, you can't save the others, so why waste them. I add half the can, which is about 3 peppers. This does not make it too hot. Just give them a quick chop and set them aside.


Now for the pork. I'm only doing one tenderloin, but the package comes with two, so I go ahead and trim the fat and silver skin off of both and freeze the other.


Add the pork to a gallon sized zip lock bag. Pour in only HALF the lime juice mixture. The other half is for basting and resting. Add the peppers to the bag. Seal and mush it around. Pop it into the fridge for 2-6 hrs.


Now go get one of those men that I called for earlier. This is the man part. Not that girls can't grill. I just don't. So here's where the instructions get a little vague. We have a gas grill(I do know that much). And I've always heard that "low and slow" is best. I really don't know how many minutes it takes to cook. Maybe 20. Best to use a thermometer. Take it off the grill when it's between 140-145 degrees. That might sound low to some of you, but the expert chefs all do it this way and it's the only way to keep the meat juicy. Plus, it does keep cooking after it comes off the heat.

While your man(or maybe you are the man) is grilling the meat. Make a canoe/pocket out of aluminum foil to rest the meat.


When the meat comes off the grill, pop it in here and pour on the OTHER half of the lime juice mixture. Seal the pocket up and let it rest for 10 min.


This is a good time to chop up some cilantro garnish. It's not the same without it.


Now it's time to carve.


For plating, you can spoon on the juice from the aluminum pocket(for more flavor), and top with cilantro.

Here's what mine looks like. What it really needs is some Mexican corn salsa. Mmmm, I'll have to try that next time. I also serve it with cilantro-lime rice.


Ingredients
  • 1 whole pork tenderloin, approximately 1 pound
  • 1 lime, zest finely grated
  • 1/2 cup freshly squeezed lime juice
  • 1/4 cup honey
  • 1 1/2 teaspoons kosher salt or 1/2 tsp table salt
  • 1/2 teaspoon garlic powder
  • 1 chipotle chile pepper in adobo sauce
  • 1 tablespoon chopped fresh cilantro leaves
Instructions

1. Juice 4 limes, and zest one of them. Add 1/4 cup honey, 1/2 tsp salt, 1/2 garlic powder. Mix well.
2. Chop 3 chipotle peppers in adobo sauce.
3. Trim pork and add to zip lock bag. Pour in half of the lime mixture. Top with peppers. Seal and mix.
4. Grill pork until center reaches 140 degrees. Rest for 10 min in an aluminum pocket with reserved juice.
5. Slice and serve with reserved juice and cilantro.

Wednesday, August 3, 2011

Painting Marathon!

Last week my parents came to help me paint all the interior walls of our house/apartment. We were geared up for a whole week of painting including 12 gallons of paint(4 different colors). We also had to gear up for a whole week of painting in 95 degree heat with no air conditioning. Fortunately, we did have a window unit, but that's only in the living room and it didn't get very cool(probably got down to 85 degrees, so certainly much better).

It's true what they say though. You DO get acclimated to the heat and it's not like we were in the sun like everyone else going from car to store in a parking lot. The only thing I got tired of was feeling so sweaty and disgusting all day. The only thing I could think about at the end of the day was a shower.

(side note: the photos in this post have nothing to do with the writing associated with it. i just thought it would be better to break up all the text with the after photos thrown in throughout)


My color selections(all color matched in Sherwin Williams No VOC Harmony paint that I got for 40% off):

Sherwin Williams White Base(2 gallons)- ceilings
Valspar Sanibel Gray(4 gallons, it's kinda aqua/sea green/gray)- Living Room/Kitchen/Hallway
Glidden Antique White(2 gallons)- Master Bedroom
Martha Stewart Heavy Goose(1 gallon)- 2nd Bedroom/Master Closet
Benjamin Moore Melon Popsicle(1 gallon)- Laundry Closet

I finally invested in those of those extension poles for painting. Even though my dad painting the very top of the walls and ceilings, it was well worth the $20! I can't believe I ever lived without one. I bought the 4-8ft pole, but found I used it at 4ft most of the time and only extended it to 5ft a few times. Part of the time when I didn't need 4 whole feet(but needed more than just the roller handle) the pole got in my way and I wish I had bought the 2-4ft pole instead.

In all my years of painting(and I've been painting rooms since I was about 14), I always had to roll where I my 5'7" self could reach, then go back with a step ladder to do the top foot and a half of the wall. NEVER AGAIN!


The bathroom color...well that's yet to be determined. We don't have to have anything painted to get our CO(certificate of occupancy), but it's just easier to not have to cover and paint around furniture after we move in. Especially since we are painting 12 ft ceilings and need to move 10 ft. ladders around. The bathroom has regular height ceilings and we won't have to worry about moving out furniture that's in the way, so I decided to wait until later to choose that color. Also, it's the only room that the color isn't predetermined by current furnishings. With a white shower curtain the only thing I would need to match to the paint would be towels and bath mats(and we could use some new bathmats).


Here's how our schedule worked out(working 8 or 9 hrs a day):

Monday- paint all ceilings, living room/kitchen, hallway
Tuesday- paint bedrooms, closets
Wednesday- caulk, puddy, and sand trim
Thursday- tape and prime trim
Friday- paint 1st coat of trim
Monday- paint 2nd coat of trim
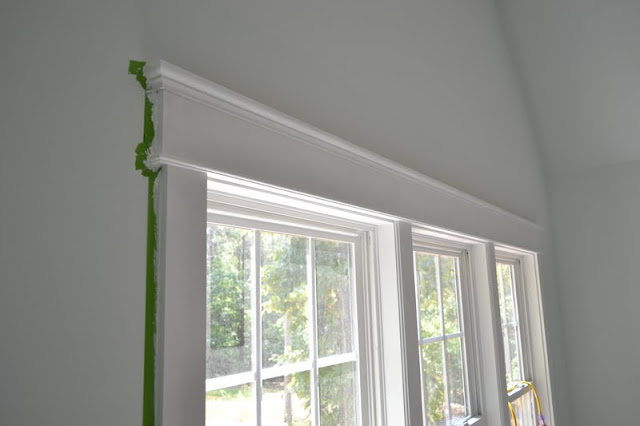


Yeah, the tape is still there because we were mid-painting when I shot these. Also, I am usually a non-taper. We did not tape off the walls at all when we painted them. But cutting in with a brush when painting a wall is much easier than painting trim and trying not to get it on the walls. Believe me! (We kinda did it backwards) While taping is tedious and time consuming(so is painting trim), it will reduce many frustrations and need for touch-ups.


I did pretty good estimating the quantities of paint. The only question mark was the master closet. After painting the little 2nd bedroom, we thought we had enough to paint the master closet. There was lots of antique white leftover from the 2 gallons, but that sounded boring for a windowless closet. And it was really hard to see where you already painted since it blended in with the white primer. We decided on heavy goose because, still being a neutral, it would blend with the colors of our bedding well.


Painting the closet commenced. I started rolling and got about half way done...and ran out of paint. Darn. Wednesday morning we made a run to Lowes for some supplies. Sherwin Williams Harmony doesn't come in quart sizes(and I figured I needed just one more quart), so I figured it's just a closet! I'll just get the heavy goose color matched at Lowes! There quart was $8 compared to about $20 at Sherwin Williams. And it's not like it was a Sherwin Williams formula color. Color matching is color matching, right?


Wrong!

I didn't really check the color after she mixed it for me because we were in a hurry and Sherwin Williams was a perfect match, so why wouldn't theirs be? I started painting right away, and while paint is wet it looks different, so I didn't notice until I ran out of paint AGAIN! By that time, where I started had dried and finally took notice that it was NO WHERE near the beautiful soft gray in the photo above!

Not like, "Hmm, do those look the same to you? One looks a tiny bit different." No. We are talking totally different color. And this is in poor light mind you. It looked like a darker battleship gray. Like cold, harsh metal. And no, I don't have a picture.


Not to waste time, my mom and I made the 20 min drive to Sherwin Williams while my dad and my in-laws were caulking and puddying the trim work. I told the guy there(who I think knows me by name now) what happened and his response was "Yeah, don't go to Lowes." Lesson learned. You pay more(at lot more), but the expertise is worth it. What I try to do is wait until I get the email or mail flyer announcing a holiday sale or sending a coupon(usually 30% or 40% off all paint and supplies). Now that's a deal! Why would you go anywhere else? I also get 10% as a "preferred customer". I didn't actually know I was a preferred customer until this last visit. So I don't know how you become one. Spending tons of money?


(this trim only has primer on it)

Anyway, to make a long story long, we got a gallon of paint(since I needed one quart to finish the closet and one quart to paint over the Lowes paint and the price of two quarts is almost the same as one gallon and I had a $10 off a $50 purchase. nice run-on sentence.) Problem solved. The paint looks great.

The rest of Wednesday was spend prepping the trim, sanding, and clean off the dust so that my mother-in-law and I could paint the next day. To clean off the dust, I got tack cloths from Lowes that feel like really sticky/waxy cheese cloths. They were leftover from when I had to sand the wall in between priming and painting(yeah left that part out). Sounds terrible, but it was surprisingly easy and simple. I already had the paint extension pole, so all I needed was a sanding block that attaches, sandpaper, and tack cloths. It was as easy has mopping walls. First with sandpaper, next with tack cloths. Done. Took me 40 minutes the morning I was wait for my parents to arrive. I didn't do the walls I couldn't reach because I would never feel the prickles up there because, duh, I can't reach them.

I've said it before, but I HATE painting trim! It's so slow! Matt does not appreciate this because I think he's only painted once in his life and he spilled a gallon of paint onto the rug, so I fired him. Banned for life I tell ya'. Haha No, while that story is true, he was at work making the money that paid for all this paint. He actually thought we could get all the trim done in one day(when it took 2.5). And we are fast. I am very happy with the way it came out and very happy that I don't have to do it again(aside for touch-ups after flooring and furniture get moved in and bump walls).

Lucy just chilled in the garage the whole week. Poor thing isn't used to this heat. She was too hot to even get into much trouble(lucky for me) and just slept.


Love her.

Monday, August 1, 2011

No More Missing Teeth

We finally got the glass for the garage door window replaced. Also, we got a new circuit board so the door actually opens and closes electronically! Yeah, yeah, I know a lot of you just want to see the paint colors now that the walls are finished, but you're just going to have to wait! I only have time for a quick post.

So, here is the garage door before(note now this was early spring and there were no leaves yet):


And now the after.


How lush and green everything is. I don't like how the tree is filling in. Trees that grow in the dense woods grow tall trying to reach the sun and have no low branches. Then we you cut away the other trees, the tree has sun everywhere and little branches pop out. I'm going to trim a lot of those to encourage more growth on the larger branches up top. It looks kinda ridiculous. But look! No more missing teeth!

LinkWithin

Related Posts Plugin for WordPress, Blogger...