Monday, December 17, 2012

How Does Your Garden Grow?

I had my first "real" garden this year.  I've planted vegetables in the past, but they were either in a small patch of the yard, or in containers.  This was the first time I had the space to plant as much as I wanted and whatever I wanted.  It was the year to experiment.  Experiment to see what worked and what didn't work.  To see how much of the crop we actually needed and could reasonably eat.

Back in April, we picked a patch of land that got full sun, was out of the way of other activities, and was within reach of the garden hose.  Matt tilled up the dirt and also tilled in compost.

I planted:
tomatoes
corn
green beans
squash
zucchini
green onions
bell peppers
jalapeƱos
watermelon
basil
mixed greens

I planned out the spacing and placement, putting the taller plants in the back.  My good friend Gita helped me plant the seeds.  Some were seeds and others I bought as plants.

Then I forgot to take pictures for two months.  Or lost them on the computer.  So, this is what the garden looked like in June (definitely not at it's peak).  I loved having fresh greens anytime for a salad!


As for what worked?  The zucchini, squash, basil, greens, onions, and jalapeƱos.  I learned that I don't need as much basil and onions.  I ended up freezing a lot of it at the end of the season to we'll have fresh basil to add to recipes during the winter (the muffin pan and water technique).  And next year I will plant the zucchini and squash in batches.  They produce a lot for one month, then taper off.  We had so much zucchini, then nothing.  So planting in rounds would be helpful.

The corn didn't really work.  I call it midget corn.  The plants were short.  The cobs were under developed.  Not sure why.  Can anyone offer advise?  We did get to eat it once.  It was delish!  I also got ONE watermelon.  It was small, but tasty.  I didn't get too many good tomatoes or green beans, but I will try them again.

Maybe we didn't have the compost tilled in good enough.  I noticed that one plant would be great and the row next to it wasn't so great.  Possible variation in nutrients?  I dunno.


I had so many harvests like this one.  Once I took a whole box full of squash, zucchini, tomatoes, basil, lettuce, peppers to the beach on vacation.  We had meals where everything but the meat came from the garden.  There was so much basil, I ended up freezing a lot of it using this technique.

Wash, dry, and cut into strips.  

Pack strips into a mini-muffin pan (as many as will fit).  

Then fill muffin pan with water and freeze.  

You can store your basil "pucks" in a gallon zip lock bag.  

They are great to toss into a pan right before serving and will quickly melt.  The basil stays green unlike when it's refrigerated.

Tuesday, October 16, 2012

Pinterest Project: Flower Tower

I realize this is a little late in the season.  I've really been procrastinating in the blog department.  Better late than never!

Inspired by this pinterest post, I made my own flower tower for our deck.  This is not the cheapest DIY project, but the beauty it adds all season long (more than one season if you plant pansies) is worth it.  You could do it cheaper by collecting mis-matched pots from thrift stores, but it's hard to find large ones.  That could take a while.

First, gather your supplies.  You'll need:

- 14 in. pot
- 12 in. pot
- 10 in. pot
- 8 in. pot
- 6 in. pot
- 12.5 in. saucer
- 36 in. half inch dowel rod
- bag of potting soil
- 20-30 annual plants

We found out the hard way that you don't really need the saucer.  Terre cotta absorbs so much of the water that there isn't really any run-off.  And if you plan on moving it, it's nearly impossible to move with the saucer.  Ours broke...twice...when Matt was picking the entire tower up to move to another location.  Try not to need to move it once it's assembled.  It was unavoidable for us.  We finally created a seating arrangement and the tower needed to move.  Then twice more when I stained the deck.

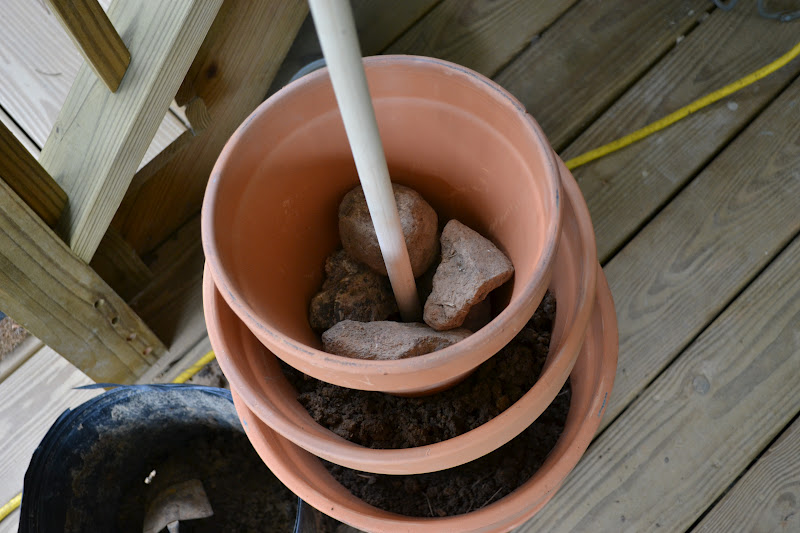
Start with the biggest pot on the bottom.  Then insert the half inch dowel.  You'll want to put some filler in the bottom half of the pot so you don't have to waste a bunch of potting soil down there.  I used rocks from the yard.  We have an unlimited supply.  

Create a nice flat bed of soil, then feed the next pot onto the dowel, making sure it's centered and level. Fill in with more potting soil.  Repeat for next layer.  Rocks, soil, pot, more soil.


Now it's time to plant your flowers!  I chose impatiens and sweet potato vines.  The back half of our deck is in full shade, so I knew the impatiens would do well, and they have.


Fast forward 3 months and this is what they looked like in August.  I love how you can't even see the pots anymore.  It's truly a tower of flowers.


It's been so long I don't remember the exact cost, but the pots were around $50 total.  And the flower maybe $5 total?  Of course I can reuse the pots year after year and vary the type of flowers used.  Can't wait til next year!

Thursday, August 9, 2012

Rock Retaining Wall

These photos date way back to March.  I had no idea that I hadn't shared them until recently.  Oops!  I guess they got overlooked.  This was around the same time Matt built the wishing well.  It was kinda a rocky month (haha get it? rocky?)

We have a two car garage which is not used for cars.  But we do need to park two cars in front of the garage door.  Back when the house was under construction, we poured gravel just where we HAD to have it.  See below how it really only fits one car parked in the center of it.  The rocks taper to the sides and you can see the cender-block foundation.  The sole purpose was to allow trucks to back up to the garage to unload stuff, not to look pretty.


For three months we parked our cars side-by-side on the mound of gravel causing the cars to lean away from each other.  Matt finally got more gravel.  I believe we got it all from the rock quarry and hauled it ourselves in Matt's dad's dump truck.  

Matt dumped then spread out the gravel with the skid steer (aka bob cat).  Since the right side of the garage is on the corner, pushing the gravel over there would have caused it just to spill around the corner.  We needed a retaining wall of some sort to hold the gravel in place and stay in front of the house.


(That pretty green winter rye grass was so pretty.  It's all dead now and looking less than stellar)

Having just gathered rocks for the well house, Matt was in rock gathering mode and disappeared back into the woods with the skid steer.  It didn't take him long to emerge with a bucket full of rocks.  And by rocks, I mean boulders.  These suckers were big.  I didn't know how he got them into the skid steer bucket.

Well, it turns out it was shear man-power.  Some of these rocks easily weigh 600+ lbs.  Matt muscled them into place, starting with the biggest ones.  As it was coming together, we realized these rocks had nice flat sides and would make great steps!


He laid the big rocks down and filled in with smaller ones on the sides.  They don't even wobble at all!


I absolutely LOVE them!  They are one of my favorite projects we've done.  It only took about 2 hours and cost NO money.  I think they really add to the "hardscape" of our yard and are completely functional (actually dual-purpose: wall/steps).  Too bad we always have a vehicle parked there, so most people who visit don't even notice them.

LinkWithin

Related Posts Plugin for WordPress, Blogger...