Thursday, May 19, 2011

Homemade Candlesticks

Mother's Day gifts can be hard. Especially if you are like me or my mom who don't like the "typical" junky gifts that just tack up your house. There are not very original or attractive. People just keep them because it has a mom or an angel on it and some mushy mom quote. Yeah, we don't like that.

Shopping is almost out of the question, because there is so much junk out there and so hard to find the perfect gift for someone when you are actually trying. I've been known to see the perfect gift at the wrong time of year, and just bought it to save for the right time.

So, I thought of something to make.

For free.

Here was my inspiration.


Finding the wood wouldn't be a problem. I would just have to walk through the woods a bit and haul a fallen tree out to the yard for Matt to cut later.

Turns out it was easier than I thought. We keep some random logs piled up around our fire pit. Some are cut nicely with a chain saw. Some are larger trees, yet to be cut and burned. I walked right up and saw some very pretty logs, which I thought were poplar, but Matt later told me were oak. I found the perfect pieces which easily fit in the car.

Then I made measurements to determine the height of the candlesticks and also the size of the hole. I also drew diagrams(trying to be all technical for my engineer). Which I would show you, but I didn't save it.

We went to Matt's home away from home(aka the shop), where Matt has all his metal working tools(lathes, welders, drill press, grinders, pipe benders, etc.) Some of which would work on wood as well, but it just takes some adjustments and practice.

The first candlestick took us 45 min, at least, to get it right(as I expected).


(sorry for the blurry cell phone pictures)

The second and third went faster.


I planned to do a second set of candlesticks that were fatter for pillar candles, but we ran out of time and only did one of them.


Matt made his own 3 inch wide cutting tool. It's nice to be married to a machinist/fabricator. Don't have a tool? Just make it real quick!

Now for the reveal with a real camera:


I just noticed all the pollen on the table. My bad.

The candles themselves are the "emergency" kind that you can get at the Dollar Tree in a box of 6. They are short and cheap, and work better for these candlesticks.

I love the way they turned out and want my own now. I can't wait to make the other two candlesticks for the pillar candles.

I packed up the set and mailed them to my mom. She was very pleasantly surprised. Funny thing is, my brother made her something from a tree too(a turned bowl made from this black walnut). Haha. She's so lucky to have kids like us!

To see more free stuff made from trees click here.

Thursday, May 12, 2011

Progress!

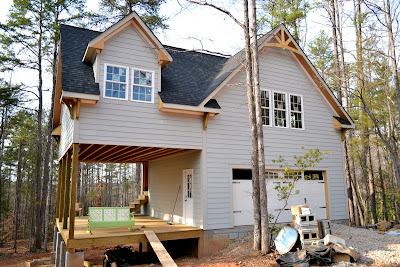
Well, I know it's been a while since you've had a construction update. Because there hasn't been anything to update about. Until now. Last week, David the framer finished the few things he had to come back for. Our job ran into another job David had on his schedule, so he had to leave it unfinished. He came back to frame these things:

-garage bathroom


-2nd bedroom wall


-kitchen pantry


-replace kitchen window
It's 4 inches wider, which all went to one side, so now the window is off center on the house, but centered over the sink(Nice run-on sentence. I know). I was pleased at how unnoticeable it looked, but Matt was surprised at HOW noticeable it looked.


David also had to:
-enlarge exterior door frame to pass egress(fire code)
-tack down siding on wall common to garage and deck(then you closed the door the siding would bang around)


But that's not the only update!

Yesterday our subcontractors started work. We've got the electrician, plumber, and HVAC guys out there working for the next few weeks. I stopped by yesterday to see them work and ask questions/answer questions. We've hired a construction manager(and family friend), Mike Hatley, to help us do the work. He's kinda taken over our job(except for the picking out stuff) and handled lining up the subs and he knows all the little details that we don't know about. He's also not working right now, so he has the time and knowledge. I have time, but no knowledge. Matt has neither(at least about construction).

There is one complication with the county that I hope resolves itself soon. We were supposed to have the house wrap inspected before the siding went up. They have to inspect the nail pattern and see how the windows were installed.


I met the inspector at the house and he showed me what section(a small 4x4ft section next to the side window) of siding needs to be removed so he can inspect it. If it passes, we can put it back up. If it fails, we have to remove ALL the siding and have it redone.


The next inspection that is due is "rough framing" which includes rough electrical, rough plumbing, and HVAC. Our frame is done, but the sub-contractors have to make cuts in it to run wire and pipes and things. So they don't inspect the frame until after it's be cut/messed up, and they let us know what has to be fixed.

The inspector was already there with me to tell me which siding to remove, so he walked through the house to do a somewhat informal frame inspection. He only found 2 small things that need to be changed. Other than that, he said it was a really great job(we already knew that). So I, and Mike, feel pretty confident that there WON'T be a problem with the house wrap. David knows what he is doing.

So that's what's going on now. It's so exciting to be in our house and be surrounded by people who are actually working on it!! I've walked around in there countless times when it's totally empty and quiet. A house under construction shouldn't be left quiet too long. The stagnation is OVER!

Tuesday, May 10, 2011

Old Bedroom- New Paint

I stayed with my parents the week of my mom's spring break. Our objective was to paint my old bedroom. It had been 6 years since it's last redo and it was over due for a change.

I don't have a true "before" photo. This photo is from 6 years ago, right after we finished that paint job. A lot has changed since then. Mainly, the Pottery Barn quilt has been flipped over to the other side to bring out more red. Red- to go with the red area rug that now lays in the middle of the newly refinished hardwood floor(no more wall-to-wall teal carpet). The melon walls needed to go.


And the after:
(Notice the HUGE difference in lens size. The before was 4 cameras ago and my DSLR fits so much more in the frame. I'm standing in the same spot in both pictures.)

Monday, May 9, 2011

Fresh Strawberry Pie

One of many reasons I'm looking forward to moving to Stanley, NC(and out of kinda-in-Charlotte-but-not-really) is I'll be right down the street from Lineberger's Farm Stand. It's a local family-owned farm(not sure if it's organic. probably not). They have pick-your-own strawberries and pumpkins. People drive 30 min just to go there, and it will be 5 min from our house.

I happened to be over there driving by during opened house, so I pulled in to see what they had that day. I left with strawberries, squash, green beans, tomatoes, and apple butter. In 3 days, we'd eaten everything but the tomatoes and apple butter.

This is what I made with the strawberries:


(not my photo)

It was fantastic!

I googled and found a recipe for Fresh Strawberry Pie, made with jello and pudding mix, instead of a sugar syrup.

Fresh Strawberry Pie

1 graham cracker crust(I used a pre-made large size)
1 carton of strawberries
1 small box Jello gelatin Strawberry flavor(sugar-free optional)
1 small box Jello pudding COOK AND SERVE Vanilla flavor(sugar-free optional)
1 1/2 cups water
Fat-free Cool Whip as topping

1. In sauce-pan, combine dry pudding mix, dry gelatin mix, and water. Bring to boil, stirring constantly.
2. After boiling and thickened, remove from heat and stir in chopped strawberries.
3. Pour into crust. Refrigerate at least 2 hours before serving.

*Must use COOK AND SERVE pudding mix.
**Try substituting other fruit and jello flavors.

Friday, May 6, 2011

Columbia Jacket

Matt has one of those parkas with the fleece/jacket liner and waterproof outer shell. You know the ones. The fancy-schmancy outdoor gear from Columbia. I have one too(one of 4 of my coats). It's the warmest thing I own.

In the 7+ years Matt has owned it, I've seen him wear the outer shell....twice? I think. Once to go skiing. Once during a snow storm. He wore the inner jacket a lot. It was his go-to coat(IF he even worn a coat!!) It wasn't just a fleece kind. It had a wind-breaker layer on top.

The zipper pull of the inner jacket broke off like....2 years ago. He kept wearing it that first winter, but had no way to zip it. He got a different jacket the next year, but still missed his old one, and kept bugging/reminding me to find out if Columbia would warranty it and repair the zipper.

So I finally mailed it in. Two weeks later I got a phone call. The lady explained that because the jacket was so old(like from 2000), their current zippers are a different model and they don't have the correct part to repair it. She called to tell me that if I sent the outer shell back too, I could pick out a whole new coat as a replacement since they warranty craftmanship for life.

So that's what I did. They told me what my replacement options and color options were(the closest current model of the coat).

We picked out this one in navy:


The original price? $200
What we paid? $0

(well...technically we paid the shipping for sending the original coat to them, so it was more like $10)

Matt modeled it when it came in 70 degree weather.


The inner jacket:


And the best part? This jacket is reversible! It was this cool aluminum foil fabric on the inside that we just had to show off! (it's way shinier in person)


I'm just kidding about the reversible part. You knew that, right?

This new coat also fits Matt better. The old parka was way too long. It hit him mid-thigh. This one has a shorter cut, so it's much more flattering.

Tree Stump Table

What's better than a good deal or a cheap DIY project? A free project! I absolutely love making things for FREE with stuff I already have around the house. Especially if it's something that looks expensive and that you want to display proudly.

Today's it's a pottery barn knock-off. I've wanted these tree stump tables since I first saw them in the catalog a few years ago. But $200?? No thank you!


Since then, I've seen other versions of this table popping up all over the interwebs. West Elm has their version:


Others bloggers have being making their own too. The Nester decided to keep the bark(a neat look as long as your bark doesn't start falling off) of the tree limb of the tree that fell in her yard. Read more about how she made hers here.


And she added casters to it, because I'm pretty sure hers it a lot heavier than mine(it's larger and greener since mine has been drying out for 2 years).


Or add a glossy stain and modern legs like this girl:


If I remember correctly, the Pottery Barn catalog said it was imported Brazilian wood. Well, I happen to think it's way cooler to have local wood from your very own yard!

Enter the black walnut.

The bark look like this:


But after sitting for two years, it had completely separated from the wood, making my job of removing it much easier. In fact, I pulled it off by hand before even carrying it to the house(because of the bugs living between the bark and wood. better to get those out now). I picked a kinda skinny one so I could carry it by myself. It's about 30 lbs.

After the bark was off, it looked like this:


The dark center is what makes black walnut black walnut.

I don't have any "in progress" photos, but it's a pretty simple explanation: just sand the heck out of it.

I have this palm sander that I bought for about $40 at Lowes.


I use it ALL THE TIME, but have never used any of the attachments(which was why I bought this model). I find that when refinishing furniture, you have to apply more pressure than you can with an attachment sticking out the end. I always revert to a finger and sandpaper, and good old fashion elbow grease for tight grooves. I would buy a better brand with less attachments if I could do it over. This one heats up over a lot of use and you have to give it(and your hand) a break.

So anyway, I used the course grit sandpaper pad(60 grit I think) and sanded for about 2 hours. The hardest part was getting the chain saw grooves off the top. The wood it a lot harder in the cross section than on the sides.

And either the wood has natural variations or I didn't sand enough on one side, but half came out blonde, and half came out brown. I tried really hard to even it out, so I'm pretty sure it just the color the wood is going to be. We don't get to have ALL the control in situations like this. Just embrace it.

To get the wood smooth, always use a finishing sandpaper that's 250 to 350 grit.

I didn't want shiny wood, so I used about 4 coats of Tung Oil. It finishes and protects the wood but doesn't sit on the surface and look shiny or fake.

The finished blonde side:


The finished brown side:


The top:


Here it is parked next to my thrift store chair:


I can't wait to get in on "hard wood" floors in our future lofty apartment! I just love it. The top isn't flat because I couldn't recut it by myself. But a glass can still sit on top just fine. That may be something I fix later if it bothers me.

LinkWithin

Related Posts Plugin for WordPress, Blogger...