Showing posts with label deals. Show all posts

Friday, June 1, 2012

Master Closet Storage

Not too long ago, our master closet looked like this:


We added the rods right after we moved in because we were just living out of a suitcase.  Then came the upper shelf.  Just like with the pantry and laundry shelves, we salvaged the melamine boards used to form our concrete counters and made shelves out of them, saving us $100-$200 in all.

This big blank wall is where shelves for more of my clothes will go.  I tossed around lots of ideas from a built in unit similar to the bathroom, to free standing already built bookcases and cubbies from Lowes or Ikea.  And cheap was definitely a priority.  

This is the awkward shelf space that we almost didn't have at all.  They were going to build those walls straight up until I stopped them.  The reason it's there at all is for head clearance on the stairs (the part where it turns and going out onto the deck).  So, I said make it as high as head clearance needs, then put a lid on it.  Thus, creating this awkward ledge area.

Notice how the top of the ledge still shows sub flooring and the drywall shows a raw edge on top.


A trip (aka "date night") to Ikea (that's right. we know how to party) was planned, complete with dinner in the cafeteria.  I was getting discouraged because I didn't see anything that would work for our narrow wall and in our budget, that is until we got to the shelving department.

I can't find the exact shelf online (ours was $7 and solid pine), but it looked kinda like this one.  They come unfinished and needed to be sanded, stained, and sealed.  Sorry, I didn't photograph those steps since I've shown it before on here.

And I picked out these brackets because...well isn't it obvious?  They were 50 cents!  And not bad looking.  I got white ones so they would blend in with the wood trim in the room.  Because they are small and made of plastic, they aren't very strong, but the only thing I'm putting on the shelves is clothing so it will be fine.  I would only worry if I was going to put books on them.

I contemplated spray painting them a cheerful color, but couldn't decide on one, so they are still white.


On top of the really high shelf is where I store my totes and handbags.  Everything was just tossed up there and I couldn't get them down without getting the folding step stool from the kitchen.  I was going to buy a storage bin, until I went in the garage and saw a huge pile of moving boxes about to be burned/recycled.  One of those would be the perfect size.   And perfect price ;-)


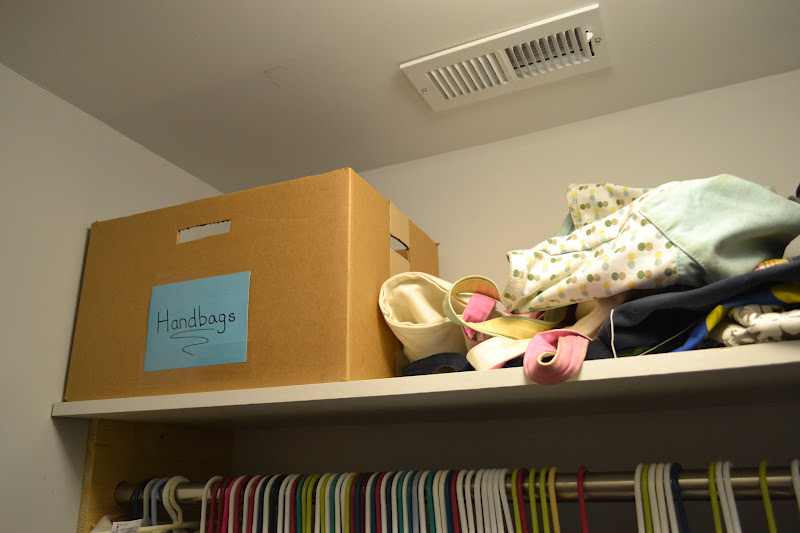
I cut the flaps off and cut out some hand-holds for easy usage.  A scrap piece of card stock label was fast and easy and makes it look less like a random cardboard box.  It serves it's purpose.  I might add another one for the larger tote bags.

Over in the awkward area...it got less awkward.  Matt capped it with melamine board (yes, one more repurposed piece), and trimmed the edge with a piece of wood to hide the ugly "innards" of the pressed melamine board and also the rough drywall edge (still needs to be painted!)


Also, purchased at Ikea that night was this step stool I'd been eyeing for quite a while.  I've seen it featured on other blogs and even used as a small side table.  I needed it to reach the top shelf of the closet.  When you utilize your tall shelves with storage, you need step stools within arms reach.  

Everything from Ikea "packs flat" in other words "if you want a low price, you assembly yourself".  I couldn't wait to unpack and assembly it...by myself.  It wasn't too difficult.  And NO, this is not "building your own furniture"!  Why do people say that??  "My husband built this."  No, he "assembled it".  Kinda like when people in new subdivisions say "When we built this house...".  You did not build that house.  The developer did.  I don't even like to take credit for building our house!

Anyway...

Getting back on track.


I've seen it painted all different colors too and thought it would be fun to paint mine a fun color.  It would need to be a color pulled out of the rag rug on the closet floor, which was easy because there are so many colors in it.  I almost went with coral, but the rug already had a lot of coral, I thought it would be too much.  And aqua is one of my top favorite colors and goes with my clothing well.  So aqua it is.  I picked out a valspar color because Lowes will mix up any color for just $3.  One little jar is plenty for a small piece of furniture.

All new wood will need a little sanding before and after the first coat of paint(or primer) goes on.  I didn't prime it because I was lazy and didn't want to dirty another brush.  It'll be fine.  After the first coat of paint, all the little wood "hairs" will stand up and get hard and dry from the paint.  Another round of quick sanding will take care of them.

As I was painting, I wanted to do something fun that I had seen on dresser drawer fronts and table tops: stencil or tape off a design and leave the wood showing through.

I don't have a photo, but I just applied a bunch of water tight painters tape (I used Frog Tape that seals as you paint).  Then sketched a design onto the tape and used a sharp knife to cut it out.  Only thing left to do was paint.


Be sure to take the tape off while the last coat is still wet.  This helps keep clean lines and prevents the paint or tape from tearing.


The last step was the apply polyurethane to the top of the stool.  I don't have a before and after of that but, it deepens the wood color slightly and also creates a seal on the wood.  Since the unpainted wood has no protection, it's important for durability since there will be feet on it.

In it's new home.


The last project featured was actually the first project completed.  I knew from the beginning that I didn't want a door on the closet.  With the bed centered under the window, it didn't leave much room for a door to swing out.  And there definitely wasn't much room for a door to swing in.  Lots of other bloggers have even removed closet doors and replaced them with curtains.  So when our house was built, we didn't even have a door jam installed, and saved a little money by not buying a door.

Again, going with something cheap and quick, I got one of those $2 rods from Target.  I thought about making a curtain panel, but I wouldn't really be saving much money and would still have to spend the time sewing it.  


At Target, I found a curtain panel that was the perfect shade of gray to match our duvet cover.  And BONUS, it's made out of this really chunky soft linen, which has beautiful texture to it.

Using tree branches is the "trendy" thing right now, and I hope that sticks around (haha that pun was a total accident) because I love the look, and I have lots of branches!  The style is very fitting to our house, ya know, since we're in the woods in all.


Now we can close the curtain to hid all the hanging clothes.  I was really getting tired of looking at them while I lie in bed.


Oh, and that texture I was telling you about.  It gave me a nice surprise at night with the light on.  Pretty cool effect, right.


Cost:
4 Mini Projects
Shelves (3 cut in half): $21
Brackets (12): $6
Stain: already had
Poly: $5
Sandpaper: already had

Step stool: $15
Paint: $3
Painters tape: already had

Melamine board: already had
Wood trim: $3

Curtain: $20
Curtain Tie-back: free from yard
Curtain Rod: $2


Friday, March 23, 2012

Kitchen Budget Breakdown

Constructing our kitchen should go down as "cheapest kitchen ever". It's THAT cheap. And I LOVE that it doesn't look like it.


Since building the structure of the house/apartment (whatever you want to call it), was WAY more expensive than we expected, we pinched everywhere to finish the kitchen. We would have pinched anyway (cuz that's just how we roll), but this was just extra motivation.

The cabinets came from a liquidation sale that we heard about through word of mouth almost 4 years ago (yes, we've been storing them that long...our whole marriage!). A local cabinet company was cleaning our their warehouse and had everything priced at around 90% off. The catch was they couldn't order anything. So, if you saw 3 cabinets you liked, those 3 cabinets was all you could get.

Our plan of attack was to find the largest matching set of cabinets. ANY cabinets. Make sure it has some upper cabinets as well. Not having a house or a layout at this point, we knew it would become a puzzle to piece them together. You can read more about how we made them work for our space here. We paid around $400 for the kitchen cabinets ($460 once you add in the bathroom vanity). No, that's not a typo. I did not leave off a zero.

We also hacked this one apart to make an over-the-microwave cabinet.


And of course, the plan was to paint the cabinets white because we didn't have all the matching trim pieces and it would have looked awful having different colors and different types of wood showing. Paint camouflages everything.


Since we were renting our old house, we didn't own the appliances. Now was my big chance to get all stainless steel! They call came from craigslist. We got the fridge for $440, the oven for around $500 (I think), dishwasher for $200, and microwave for $200.

Our original plan was to get laminate counters, but once we looked into it we realized it would be over $1000 for fake plastic countertops and I just really couldn't see paying that. After seeing online tutorials, DIY concrete countertops seemed like something we could do for a fraction of the cost. See the final product here.

Hardware can really add up and contribute to a lot of a kitchen's cost and it's often overlooked when budgeting. Even basic brushed nickel knobs at Lowes cost $4/each. I found basic oil-rubbed bronze knobs and pulls on ebay for $1/each. Since we needed over 22, that works out to a significant savings.


The last major element to our kitchen was the opened shelving. We saved money by using free wood from our land and getting the basic cheap brackets from Lowes and spray painting them oil-rubbed bronze. More on that here.

Then, there's the sink, faucet, and light fixtures. We went basic and cheap for all of them except the faucet. Faucets range from $50-$1000. Sticking with a good name brand was important. We wanted something that wouldn't give us problems. Basically, we got the most attractive thing in the cheap range for $200. And it's a Delta. The light fixtures came from Ikea.

That brings us to the breakdown.

Our Kitchen:

Cabinets: $400
Appliances: $1340
Knobs and Pulls: $25
Counters: $300
Paint: $30
Shelves and Brackets: $47
Sink: $100
Faucet: $200
Hanging Lights: $90

Total: $2,532

...call it $2,500


And by comparison...

A Typical Kitchen:

Ikea Cabinets: $2,000
New Stainless Steel Appliances: $3,700
Knobs and Pulls: $100
Laminate Counters: $1,200
Shelves and Brackets: $150
Sink: $100
Faucet: $200
Hanging Lights: $90

Total: $7,500

Or more like $13,000-15,000 for higher end things like solid surface, granite, or nicer than Ikea cabinets. I didn't include flooring for either total, or any dining furniture (our bar stools were hand-me-downs, btw).

So, like I said. Cheapest-kitchen-ever!!!

Friday, May 6, 2011

Columbia Jacket

Matt has one of those parkas with the fleece/jacket liner and waterproof outer shell. You know the ones. The fancy-schmancy outdoor gear from Columbia. I have one too(one of 4 of my coats). It's the warmest thing I own.

In the 7+ years Matt has owned it, I've seen him wear the outer shell....twice? I think. Once to go skiing. Once during a snow storm. He wore the inner jacket a lot. It was his go-to coat(IF he even worn a coat!!) It wasn't just a fleece kind. It had a wind-breaker layer on top.

The zipper pull of the inner jacket broke off like....2 years ago. He kept wearing it that first winter, but had no way to zip it. He got a different jacket the next year, but still missed his old one, and kept bugging/reminding me to find out if Columbia would warranty it and repair the zipper.

So I finally mailed it in. Two weeks later I got a phone call. The lady explained that because the jacket was so old(like from 2000), their current zippers are a different model and they don't have the correct part to repair it. She called to tell me that if I sent the outer shell back too, I could pick out a whole new coat as a replacement since they warranty craftmanship for life.

So that's what I did. They told me what my replacement options and color options were(the closest current model of the coat).

We picked out this one in navy:


The original price? $200
What we paid? $0

(well...technically we paid the shipping for sending the original coat to them, so it was more like $10)

Matt modeled it when it came in 70 degree weather.


The inner jacket:


And the best part? This jacket is reversible! It was this cool aluminum foil fabric on the inside that we just had to show off! (it's way shinier in person)


I'm just kidding about the reversible part. You knew that, right?

This new coat also fits Matt better. The old parka was way too long. It hit him mid-thigh. This one has a shorter cut, so it's much more flattering.

Tree Stump Table

What's better than a good deal or a cheap DIY project? A free project! I absolutely love making things for FREE with stuff I already have around the house. Especially if it's something that looks expensive and that you want to display proudly.

Today's it's a pottery barn knock-off. I've wanted these tree stump tables since I first saw them in the catalog a few years ago. But $200?? No thank you!


Since then, I've seen other versions of this table popping up all over the interwebs. West Elm has their version:


Others bloggers have being making their own too. The Nester decided to keep the bark(a neat look as long as your bark doesn't start falling off) of the tree limb of the tree that fell in her yard. Read more about how she made hers here.


And she added casters to it, because I'm pretty sure hers it a lot heavier than mine(it's larger and greener since mine has been drying out for 2 years).


Or add a glossy stain and modern legs like this girl:


If I remember correctly, the Pottery Barn catalog said it was imported Brazilian wood. Well, I happen to think it's way cooler to have local wood from your very own yard!

Enter the black walnut.

The bark look like this:


But after sitting for two years, it had completely separated from the wood, making my job of removing it much easier. In fact, I pulled it off by hand before even carrying it to the house(because of the bugs living between the bark and wood. better to get those out now). I picked a kinda skinny one so I could carry it by myself. It's about 30 lbs.

After the bark was off, it looked like this:


The dark center is what makes black walnut black walnut.

I don't have any "in progress" photos, but it's a pretty simple explanation: just sand the heck out of it.

I have this palm sander that I bought for about $40 at Lowes.


I use it ALL THE TIME, but have never used any of the attachments(which was why I bought this model). I find that when refinishing furniture, you have to apply more pressure than you can with an attachment sticking out the end. I always revert to a finger and sandpaper, and good old fashion elbow grease for tight grooves. I would buy a better brand with less attachments if I could do it over. This one heats up over a lot of use and you have to give it(and your hand) a break.

So anyway, I used the course grit sandpaper pad(60 grit I think) and sanded for about 2 hours. The hardest part was getting the chain saw grooves off the top. The wood it a lot harder in the cross section than on the sides.

And either the wood has natural variations or I didn't sand enough on one side, but half came out blonde, and half came out brown. I tried really hard to even it out, so I'm pretty sure it just the color the wood is going to be. We don't get to have ALL the control in situations like this. Just embrace it.

To get the wood smooth, always use a finishing sandpaper that's 250 to 350 grit.

I didn't want shiny wood, so I used about 4 coats of Tung Oil. It finishes and protects the wood but doesn't sit on the surface and look shiny or fake.

The finished blonde side:


The finished brown side:


The top:


Here it is parked next to my thrift store chair:


I can't wait to get in on "hard wood" floors in our future lofty apartment! I just love it. The top isn't flat because I couldn't recut it by myself. But a glass can still sit on top just fine. That may be something I fix later if it bothers me.

Monday, March 28, 2011

Quick Goodwill Before and After

About a month ago, someone donated their owl tchotchke collection to Goodwill. I've had a little infatuation with owls even since seeing so many cute baby nurseries with owl themes. So I immediatly gravitated to the shelf with the owls on it. There were some ugly owls. Most of them were, actually. There was one that I considered buying, but it was a little one standing only about 4 inches tall. It was priced at $3. That was way too much for Goodwill and for something I was on the fence about. So I passed on it.

Then last week, Goodwill had a clearance table near the register. I had just walked in with a return and was standing in line eyeballing the table. I saw several of the same owls on it, all with mark-downs. I saw the owl I had wanted to buy as well. As soon as I made my return, I was going to grab it.

Then another shopper stopped to look at them and picked up MY owl!! I tried to communicate with her telepathically to put the owl down, but into her cart it went! No!!

When I got to the table, I saw that many had prices like 40 cents on them. Bummer. I missed a good deal.

Then I spotted this guy.


It's an 8 or 9 inch tall door stop, and ugly as h-e-double hockey sticks.

But as I've seen on numerous other blogs, a coat of white spray paint can do wonders. And I already have paint at home. With the price of $1.99, and in the words of Brandy and Monica, "the boy is mine".

I took him home and wiped him down(he had some dirty cobweb junk around the feet). Then about five minutes later(plus drying time) he looked like this:


His temporary home will be holding our hallway door open(even though the colors look TERRIBLE!)

He'll look much better on dark hardwood floors, or up on a shelf in our new house. I might even repaint him a bold color, but I just wanted to get it painted in the meantime.

Thursday, March 24, 2011

Christmas Came Early for Matt

One day while we were on our way to our land, we drove by a house and saw a tractor and a gathering of other vehicles and people. Since Matt was driving, I got the better look and saw that they had a rope tied half way up this really huge tree and had already cut a wedge in the back side.


I told Matt they were cutting it down. And based on their equipment, the position of the rope, and the depth(lack of depth) of the wedge, Matt dropped me off at the land and headed back over to the tree people to watch them push a tree down on top of their cars, or house, or a person, because they clearly had no idea what they were doing.

By the time he got back, there was an arborist that had pulled over to watch too. The arborist helped them move the rope higher up the tree. The rope is to help control the tree as it starts to fall. The higher it is, the more leverage/control you have. Oh and by the way, we found out they were cutting it down because it had been struck by lightning and was dying.


Also this "wedge" they cut was only about 6 or 8 inches deep into a 4ft diameter tree- REALLY not going to do anything! Come on, even I know that and I've never cut a tree down.


The tree fell without any events and Matt called me to ask if he could have some of the wood. I said "For what?" And he said "For whatever. To split, for firewood, to have sawed into boards."


(ok we won't have a fireplace after we move, so who is all this wood for?)


Matt said he wanted it to split and he could give it away.

(He loves splitting wood. I think it makes him feel "old school" like the pioneers who built this country with no power tools.)

"Ok, fine."

The guy needed to get rid of it and we were right down the road. And BONUS! Matt got to use his skid steer to unload them!!(catch the sarcasm?)


So, the guy brought his trailer over and drove around the back of our house to unload them.

First the limbs:


Then the trunks:


Here, you can see how much the trailer flexed with weight of the stumps on them. In the previous photos, I watched in a sideshow and you could see the trailer flex, then flex back the other way as the stump fell off.


Matt tried to roll it.


It didn't move.


LinkWithin

Related Posts Plugin for WordPress, Blogger...